The post What is the Difference Between ASME Section VIII Div1 Div2 and Div3 appeared first on Let'sFab.
]]>ASME Section VIII Div1, Div2, and Div3 are the Pressure Vessel Design Code. In this Code various guidelines, rules, and regulatory requirements for pressure vessel Materials, Design, Fabrication, Examination, Inspection, Testing, Certification, and safety. This Code is may seem to be similar but all have some distinct Difference between ASME Section VIII Div1, Div2, and Div3, So Now in this post, we are going to discuss all differences.
In this Post we have elaborate following :
- ASME Pressure Vessel Code Section VIII.
- List of Subsections.
- ASME Section VIII Div 1.
- ASME Section VIII Div 2.
- ASME Section VIII Div 3.
- Difference Between ASME Section VIII Div1, Div2 and Div3.
ASME Pressure Vessel Code, Section VIII (Rules for construction of pressure vessels)
Most pressure vessels employed in industries today are designed consistent with the ASME BPVC Section VIII, which consists of ordinary codes and rules that a manufacturer is required to follow. More than 60 countries worldwide generally recognize and apply the Boiler and Pressure Vessel Code (BPVC) for pressure vessel design. Boiler and Pressure Vessel Code Section VIII is specifically designed to guide mechanical engineers in designing, constructing, and maintaining PVs operating at either internal or external pressure exceeding 15 PSIG.
ASME Section VIII in itself consists of three divisions, where Division 1 is concentrated on a design-by-rule approach and Division 2 on the design-by-analysis approach. Division 3 is supposed for designing pressure vessels that need internal or external operating at a pressure above 10,000 PSI.
While ASME Section VIII, Division 1 is a design-by-rule approach is most commonly utilized by engineers to size the pressure vessel according to the appliance requirements, it’s quite a conservative approach. The empirical relations and other mandatory and non-mandatory criteria often end in an upscale pressure vessel design.
ASME Section VIII, Division 2 is a design-by-analysis approach that requires more detailed calculations than Division 1. Although this might increase the value of pressure vessel design, it allows pressure vessels to face up to higher stresses.
ASME Section VIII, Division 2 is meant for purpose-specific vessels with an outlined fixed location. Another major difference between Division 1 and Division 2 lies in failure theory. While Division 1 is predicated on normal stress theory, Division 2 is predicated on maximum distortion energy (Von Mises).
The codes mentioned under Section VIII for both divisions also having appendices. These appendices are alternative or supplementary rules that function guidelines since they’re less frequently employed than the most body codes. However, the appendices themselves contain both mandatory and non-mandatory sections regarding the design of the sections.
The mandatory appendices are as important as the code itself and provide alternative rules to the main codes included in the body. At present, there are 40 mandatory appendices included in ASME Section VIII. Non-mandatory appendices aren’t a requirement for ASME certification. However, it is good practice to keep them in mind as they can be particularly helpful in design verification and testing.
A new edition of the ASME BPVC codes is issued every two years, including revisions in interpretations and code cases. A code case is an urgent revision of the ASME code to be included in the current running editions. Currently, the 2015 edition is in practice, while the 2017 edition will be made available to the public by July 2017.
With each remake, the codes are refined to assist pressure vessel manufacturers to suit the applicable regulations and gain operational, cost, and safety benefits. within the future, the codes are likely to be developed considering advances in technologies and therefore the use of advanced materials. for instance, future codes will include detailed recommendations in stress analysis methods, component modeling, and result validation.
LIST OF SECTIONS
Below is the structure for the 2019 Edition of the BPV Code:
• ASME BPVC Section I – This section is for the rules of Construction of Power Boilers
• ASME BPVC Section II – Materials
• Part A – Ferrous Material Specifications
• Part B – Nonferrous Material Specifications
• Part C – This part is specially created for the specifications for Welding Rods, Electrodes, and Filler Metals
• Part D – Properties (Customary)
• Part D – Properties (Metric)
• ASME BPVC Section III – This section is for the rules for the Construction of Nuclear Facility Components
• Subsection NCA – This section defines the General Requirements for Division 1 and Division 2
• Appendices
• Division 1
• Subsection NB – Class 1 Components
• Subsection NC – Class 2 Components
• Subsection ND – Class 3 Components
• Subsection NE – Class MC Components
• Subsection NF – Supports
• Subsection NG – Core Support Structures
• Division 2 – Code for Concrete Containments
• Division 3 – Containment Systems for Transportation and Storage of Spent Fuel and High-Level material
• Division 5 – heat Reactors
• ASME BPVC Section IV – This section defines the Rules for manufacturing of Heating Boilers
• ASME BPVC Section V – Section V is for the Non-destructive Examination
• ASME BPVC Section VI – The section Recommends the Rules for the Care and Operation of Heating Boilers
• ASME BPVC Section VII – This section Recommends the Guidelines for the Care of Power Boilers
• ASME BPVC Section VIII – This section defines the rules for the Construction of Pressure Vessels
• Division 1
• Division 2 – Alternative Rules
• Division 3 – Alternative Rules for Construction of high Vessels
• ASME BPVC Section IX – This section is especially for Welding, Brazing, and Fusing Qualifications
• ASME BPVC Section X – This section defines the Fiber-Reinforced Plastic Pressure Vessels
• ASME BPVC Section XI – Rules for Inservice Inspection of atomic power Plant Components
• Division 1 – This division is for the rules of Inspection and Testing of Components of Light-Water-Cooled Plants
• Division 2 – Requirements for Reliability and Integrity Management (RIM) Programs for atomic power Plants
• ASME BPVC Section XII – This section defines the rules for the development and Continued Service of Transport Tanks including cylindrical horizontal & capsule tanks
• ASME BPVC Code Cases – This section is specially designed for the Boilers and Pressure Vessels
ASME Section VIII Div 1
this division is very important from a design perspective because of the compulsory requirements, specific prohibitions, and impulsive, guidelines for materials, design, fabrication, inspection, and testing, markings and reports, overpressure protection, and certification of pressure vessels having an indoor or external pressure more than 15 psi (100 kPa) all will be done in the division.
pressure vessels are often either fired or unfired. The pressure could also be from external sources, or by the appliance of heating from an indirect or direct source, or any combination thereof.
The Division isn’t numbered within the traditional method (Part 1, Part 2, etc.) but is structured with Subsections and Parts which contains letters followed by variety. The structure is as follows:
• Subsection A – General Requirements
• Part UG – General Requirements for All Methods of Construction and every one Materials
• Materials: UG-4 through to UG-15
• Design: UG-16 through to UG-35
• Openings and Reinforcements: UG-36 through to UG-46
• Braced and Stayed Surfaces: This section defines the UG-47 through to UG-50
• Fabrication: UG-75 through to UG-85
• Inspection and Tests: UG-90 through to UG-103
• Marking and Reports: UG-115 through to UG-120
• Overpressure Protection: UG125 through to UG-140
• Subsection B – Requirements concerning Methods of Fabrication of Pressure Vessels
• Part UW – This section defines the Requirements for Pressure Vessels Fabricated by Welding
• General: UW-1 through to UW-3
• Materials: UW-5
• Design: UW-8 through to UW-21
• Fabrication: UW-26 through to UW-42
• Inspection and Tests: UW-46 through to UW-54
• Marking and Reports: UW-60
• Pressure Relief Devices: UW-65
• Part UF – This section defines the Requirements for Pressure Vessels Fabricated by Forging
• General: UF-1
• Materials: UF-5 through to UF-7
• Design: UF-12 through to UF-25
• Fabrication: UF-26 through to UF-43
• Inspection and Tests: UF-45 through to UF-55
• Marking and Reports: UF-115
• Pressure Relief Devices: UF-125
• Part UB – This section defines the requirements for Pressure Vessels Fabricated by Brazing
• General: UB-1 through to UB-3
• Materials: UB-5 through to UB-7
• Design: UB-9 through to UB-22
• Fabrication: UB-30 through to UB-37
• Inspection and Tests: UB-40 through to UB-50
• Marking and Reports: UB-55
• Pressure Relief Devices: UB-60
• Subsection C – Requirements concerning Classes of Materials
• Part UCS – This section defines the requirements for Pressure Vessels Constructed of Carbon and Low Alloy Steels
• General: UCS-1
• Materials: UCS-5 through to UCS-12
• Design: UCS-16 through to UCS-57
• Low-Temperature Operation: UCS-65 through to UCS-68
1:Fabrication: UCS-75 through to UCS-85
• Inspection and Tests: UCS-90
• Marking and Reports: UCS-115
• Pressure Relief Devices: UCS-125
• Nonmandatory Appendix CS: This section defines the UCS-150 through to UCS-160
• Part UNF – This section defines the requirements for Pressure Vessels Constructed of Nonferrous Materials.
- General: UNF-1 through to UNF-4
• Materials: UNF-5 through to UNF-15
• Design: UNF-16 through to UNF-65
• Fabrication: UNF-75 through to UNF-79
• Inspection and Tests: UNF-90 through to UNF-95
• Marking and Reports: UNF-115
• Pressure Relief Devices: UNF-125
• Appendix NF: This section defines the characteristics of the Nonferrous Materials (Informative and Nonmandatory)
• Part UHA Requirements for Pressure Vessels Constructed of High steel
• General: UHA-1 through to UHA-8
• Materials: UHA-11 through to UHA-13
• Design: UHA-20 through to UHA-34
• Fabrication: UHA-40 through to UHA-44
• Inspection and Tests: UHA-50 through to UHA-52
• Marking and Reports: UHA-60
• Pressure Relief Devices: UHA-65
• Appendix HA: This section is for the suggestions on the choice and Treatment of Austenitic Chromium-Nickel and Ferritic and Martensitic High Chromium Steels (Informative and Nonmandatory)
• Part UCI – Requirements for Pressure Vessels Constructed of forged iron
• General: UCI-1 through to UCI-3
• Materials: UCI-5 through to UCI-12
• Design: UCI-16 through to UCI-37
• Fabrication: UCI-75 through to UCI-78
• Inspection and Tests: UCI-90 through to UCI-101
• Marking and Reports: UCI-115
• Pressure Relief Devices: UCI-125
• Part UCL – Welded Pressure Vessels Constructed of fabric With Anti Corrosion Integral Cladding, Weld Metal Overlay Cladding, or With Applied Linings are covered in this section.
• General: UCL-1 through to UCL-3
• Materials: UCL-10 through to UCL-12
• Design: UCL-20 through to UCL-27
• Fabrication: UCL-30 through to UCL-46
• Inspection and Tests: UCL-50 through to UCL-52
• Marking and Reports: UCL-55
• Pressure Relief Devices: UCL-60
• Part UCD – This section to define the requirements for Pressure Vessels Constructed of Cast Ductile Iron
• General: UCD-1 through to UCD-3
• Materials: UCD-5 through to UCD-12
• Design: UCD-16 through to UCD-37
• Fabrication: UCD-75 through to UCD-78
• Inspection and Tests: UCD-90 through to UCD-101
• Marking and Reports: UCD-115
• Pressure Relief Devices: UCD-125
• Part UHT is made for the requirements for Pressure Vessels Constructed of Ferritic Steels With Tensile Properties Enhanced by Heat Treatment.
• General: UHT-1
• Materials: UHT-5 through to UHT-6
• Design: UHT-16 through to UHT-57
• Fabrication: UHT-75 through to UHT-86
• Inspection and Tests: UHT-90
• Marking and Reports: UHT-115
• Pressure Relief Devices: UHT-125
• Part ULW is designed to define the requirements for Pressure Vessels Fabricated by Layered Construction
• Introduction: ULW-1 through to ULW-2
• Materials: ULW-5
• Design: ULW-16 through to ULW-26
• Welding: ULW-31 through to ULW-33
2:* Non-destructive Examination of Welded Joints: This section is for the ULW-50 through to ULW-57
• Fabrication: ULW-75 through to ULW-78
• Inspection and Tests: ULW-90
• Marking and Reports: ULW-115
• Pressure Relief Devices: ULW-125
• Part ULT Alternative Rules for Pressure Vessels Constructed of Materials Having Higher Allowable Stresses at coldness
• General: ULT-1 through to ULT-5
• Design: ULT-16 through to ULT-57
• Fabrication: ULT-76 through to ULT-86
• Inspection and Tests: ULT-90 through to ULT-100
• Marking and Reports: ULT-115
• Pressure Relief Devices: ULT-125
• Part UHX – This part defines the rules for Shell-and-Tube Heat Exchangers
• Part UIG – This part defines the requirements for Pressure Vessels Constructed of Impregnated Graphite
• General: UIG-1 through to UIG-3
• Materials: UIG-5 through to UIG-8
• Design: UIG-22 through to UIG-60
• Fabrication: UIG-75 through to UIG-84
• Inspection and Tests: UIG-90 through to UIG-112
• Marking and Reports: UIG-115 through to UIG-121
3:* Pressure Relief Devices: UIG-125
• MANDATORY APPENDICES: 1 through to 44
• NONMANDATORY APPENDICES: A through to NN
ASME Section VIII Div 2 (Alternative Rules)
This division covers the compulsive requirements related to the manufacturing of pressure vessel including specific prohibitions, and nonmandatory guidance for materials, design, fabrication, inspection, and testing, markings and reports, overpressure protection, and certification of pressure vessels having an indoor or external pressure which exceeds 3000 psi (20700 kPa) but 10,000 psi.
The pressure vessel is often either fired or unfired. The pressure could even be from external sources, or by the appliance of heating from an indirect or direct source as a result of a process, or any combination of the 2.
The rules contained during this section are often used as an alternate to the minimum requirements laid call at Division 1. Usually, the Div. 2 rules are more onerous than in Div. 1 with regard to materials, design, and nondestructive examinations but higher design stress intensity values are allowed. Div. 2 has also provisions for the use of finite element analysis to figure out expected stress in pressure equipment, additionally to the traditional approach of design by formula (Part 5: “Design by Analysis Requirements”).
ASME Section VIII Div 3 (Optional rules for the Construction of High-Pressure Vessels)
This division covers the compulsory requirements for the manufacturing & design of the pressure vessel including specific prohibitions, and nonmandatory guidance for materials, design, fabrication, inspection, and testing, markings and reports, overpressure protection, and certification of pressure vessels having an indoor or external pressure which exceeds 10,000 psi (70,000 kPa).
The pressure vessel is often either fired or unfired. The pressure could also be from external sources, by the appliance of heating from an indirect or direct source, process reaction, or any combination thereof.
Difference Between ASME Section VIII Div1, Div2, and Div3
| Parameters | ASME Section VIII Div 1 | ASME Section VIII Div 2 | ASME Section VIII Div 3 |
| Code Published Year | less than 1940 | Year – 1968 | Year – 1997 |
| Code Pressure limits | up to 3000 psig | No limits; usually more than 600 psig | No limit; usually more than 10,000 psig |
| Organization Structure | General, Construction Type & Material U, UG, UW, UF, UB, UCS, UNF, UCI, UCL, UCD, UHT, ULT | General, Material, Design, Fabrication and others AG, AM, AD, AF, AR, AI, AT, AS | Like Division 2 KG, KM, KD, KF, KR, KE, KT, KS |
| Design Safety Factor | Design Safety Factor is 3.5 | Design Safety Factor is 3 | Based on Yield with reduction factor for yield strength to tensile strength ratio less is than 0.7 |
| Code Design Rules | Membrane – Maximum stress Generally Elastic analysis Very detailed design rules with Quality (joint efficiency) Factors. Little stress analysis required; pure membrane without consideration of discontinuities controlling stress concentration to a safety factor of 3.5 or higher | Shell of Revolution – Max. shear stress Generally Elastic analysis Membrane + Bending. Fairly detailed design rules. In addition to the design rules, discontinuities, fatigue, and other stress analysis considerations may be required unless exempted and guidance provided for in Appendix 4, 5 and 6 | Maximum shear stress Elastic/Plastic Analyses and more. Some design rules provided; Fatigue analysis required; Fracture mechanics evaluation required unless proven leak-before-burst, Residual stresses become significant and maybe positive factors (e.g. autofrettage) |
| Experimental Stress Analysis | Normally not required | Introduced and may be required | Experimental design verification but may be exempted |
| Material and Impact Testing | Few restrictions on materials; Impact required unless exempted; extensive exemptions under UG-20, UCS 66/67 | More restrictions on materials; impact required in general with similar rules as Division 1 | Even more restrictive than Division 2 with different requirements. Fracture toughness testing requirement for fracture mechanics evaluation Crack tip opening displacement (CTOD) testing and establishment of KIc and/or JIc values |
| NDT Requirements | NDT requirements may be exempted through increased design factor | More stringent NDT requirements; extensive use of RT as well as UT, MT, and PT. | Even more restrictive than Division 2; UT used for all butt welds, RT otherwise, extensive use of PT and MT |
| Welding and fabrication | Different types with butt welds and others | Extensive use/requirement of butt welds and full penetration welds including non-pressure attachment welds | Butt Welds and extensive use of other construction methods such as threaded, layered, wire-wound, interlocking strip-wound, and others |
| User | User or designated agent to provide specifications (see U-2(a) | User’s Design Specification with detailed design requirements (see AG-301.1) include AD 160 for fatigue evaluation | User’s Design Specification with more specific details (see KG-310) including contained fluid data, etc with useful operation life expected and others. Designer define |
| Manufacturer | Manufacturer to declare compliance in data report | Manufacturer’s Design Report certifying design specification and code compliance in addition to data report | Same as Division 2 |
| Professional Engineer Certification | Normally not required | Professional Engineers’ Certification of User’s Design Specification as well as Manufacturer’s Design Report Professional Engineer shall be experienced in pressure vessel de | Same as Division 2 but the Professional Engineer shall be experienced in high pressure vessel design and shall not sign for both User and Manufacturer |
| Safety Relief Valve | UV Stamp | UV Stamp | UV3 Stamp |
| Code Stamp and Marking | U Stamp with Addition markings including W, P, B, RES; L, UB, DF; RT, HT | U2 Stamp with Additional marking including H | U3 Stamp with additional marking denoting construction type; HT, PS, WL, M, F, W, UQT, WW, SW |
| Hydrostatic Pressure Test | 1.3 time MAWP | 1.25 times MAWP | 1.25 times MAWP |
So, all the above are the difference between ASME Section VIII Div1, Div2, and Div3.
If you want to increase the accuracy, efficiency, and productivity of your fabrication works and save your time and cost of fabrication then you can use our various digitals tools that help you in your daily fabrication activity Click here know about our digital tools…
If you want to increase your knowledge by learning from us then you can join our various video course in the field of fabrication, Click here more for details about our courses.
The post What is the Difference Between ASME Section VIII Div1 Div2 and Div3 appeared first on Let'sFab.
]]>The post Cone Layout Development by Marking and Calculation Method with Practical Example appeared first on Let'sFab.
]]>Full Cone is a very common shape in fabrication industry as it is most frequently used shape in fabrication so it is very necessary that every fabrication engineer or professionals in fabrication field must have knowledge of Cone layout Development if you have detailed knowledge of cone fabrication it is very useful to you while working in fabrication daily activities. So, in this post, we are covering all the Points related to Full Cone Layout Development so that you can learn in-depth and used this method in daily fabrication activity.
We are going to explain this Cone layout in both Geometrical and Numerical Methods and at the end of learning this method, we have taken one practical Example of Full Cone Fabrication Layout Development to understand the use of this method for layout Development. We had also provided you example solution checking method using our Fabrication Calculator tool so that you can verify your calculation with some tested tools and make you confident in the fabrication layout. You can practice this method by taking more examples yourself and verify your answer by our tools and become an expert in Full Cone Fabrication Layout Development.
Geometrical Method or Marking Method for Full Cone Layout
Geometrical Method of Full Cone Fabrication Layout Development is also called Graphical Method of Full Cone Layout Development, in this layout, Method layout markings are developed using direct measuring of the Geometrical shape of Full Cone. This Method is Basic Method for fabrication Layout but it required much time to draw the Geometry of actual size and it also has limitation for Bigger Sizes to avoid this limitation you have to use computerized tool Such as Auto Cad Software and to the developed layout using this software also required skilled manpower to generate layout it cost us more in terms of extra skilled manpower and extra time for drawing layout. If the fabrication layout shape is complex then it is not economical. Now, we will move towards learning Full Cone Fabrication Layout Development using Geometrical Method in Step by Step process.
We recommend you that always use mean dimensions for Fabrication layout development it gives more Accuracy of fabrication Layout Marking Compared to Outside or Inside Dimensions.
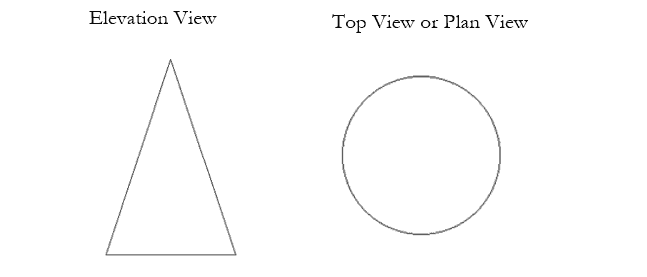
Step 1: Draw Elevation View & Plan View for Full Cone Shape.
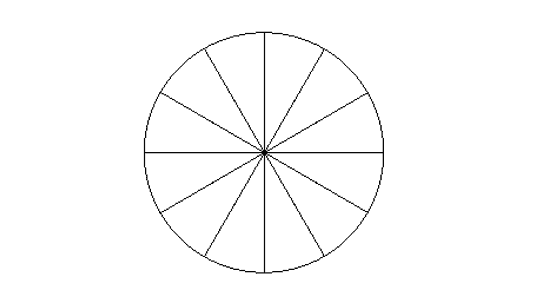
Step 2: Divide Top View Circle of Cone in equal no. of Parts.
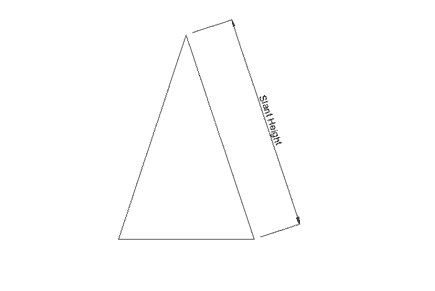
Step 3: Measure Slant Height of the Cone in elevation view.
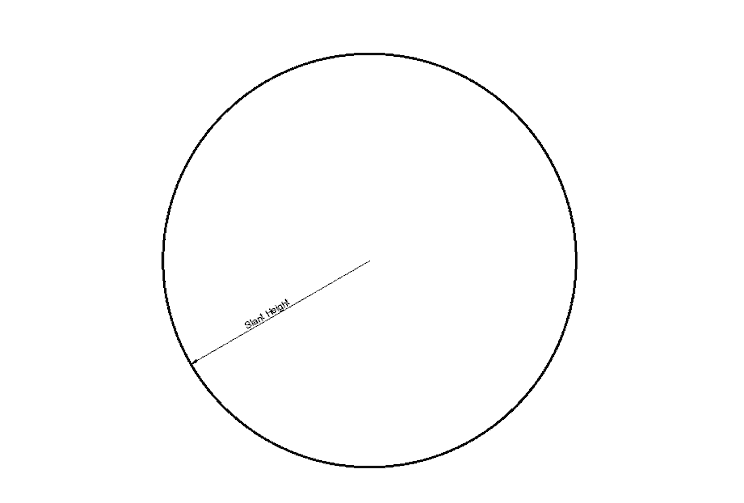
Step 4: Draw Development Circle with Radius as Slant Height.
Step 5: Measure Dividing Distance (L) From the Top view of Divided Circle.
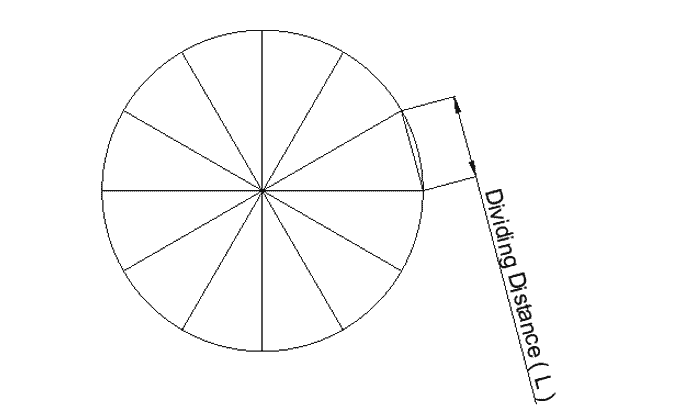
Step 6: Mark the Development Circle with Dividing Distance (L) in to equal no of parts in top view.
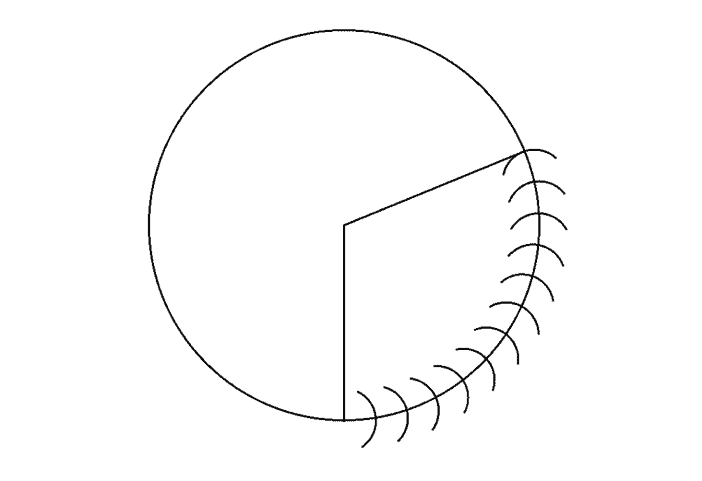
Step 7: Trim the remaining part to get layout of the Full Cone.
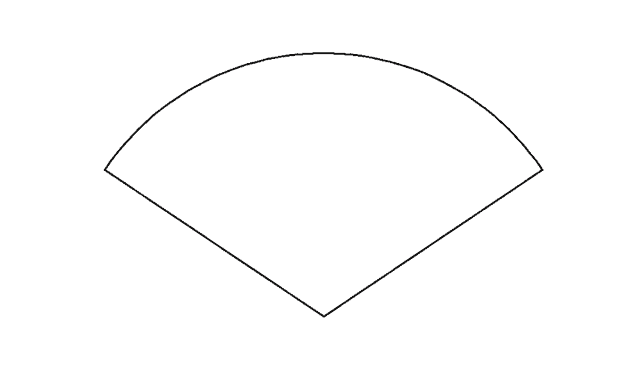
In this way we can generate fabrication layout of Full Cone using Geometrical Method or Graphical Method of Fabrication Layout Development.
Numerical Method or Calculation Method for Full Cone Layout
Numerical Method for Full Cone layout Development is a very faster and time-saving method for layouting, you can calculate the values of layout dimension by solving manually on a scientific calculator or you can use any computerized tool for solving such as MS Excel or any other tool for Calculates Values in a faster way.
Now we will move towards learning Numerical Method for Full Cone fabrication layout development in this Method We are Discussing Two Cases for Layout Development.
Case 1: Cone Angle and Cone Diameter Given
Step 1: Define Generalized Diagram of Full Cone Layout Development.
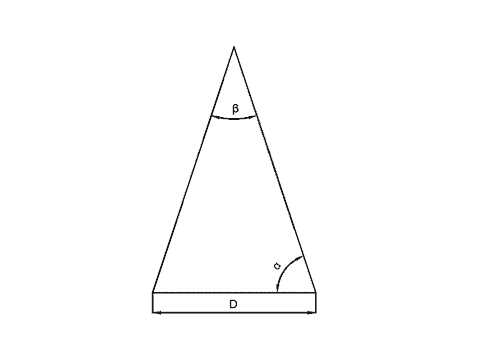
Step 2: Define Variables for Full Cone Layout.
Let,
D = Base Mean Diameter of Cone.
α = Cone Angle
β = Cone Included Angle.
R = Development Radius.
Θ = Development Angle.
X = Cone Cord Length.
Step 3: Calculate Development Radius R of Full Cone.
If α is given then,
R = ( D/2 ) / Cos (α)
If β is given then,
R = ( D/2 ) / Sin (β/2)
Step 4: Calculate Development Angle Θ.
Θ = ( (D/2) / R ) x 360
Step 4: Calculate Cone Cord Length X
X = 2 x R x Sin (Θ/2)
Step 5: Development of Cone Layout.
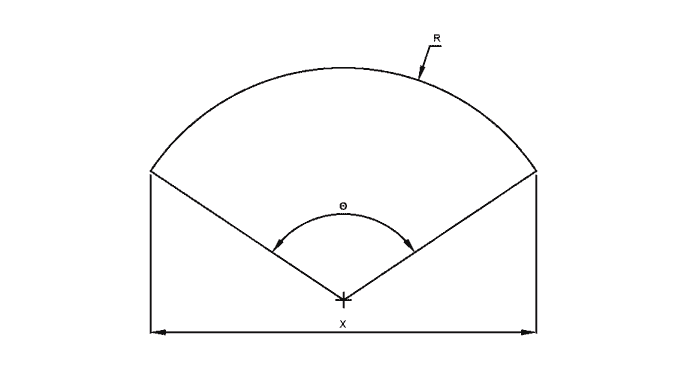
In this way we can develop fabrication Layout when we had problem like case-1 where Cone angle and Cone Diameter is Given. Now we will see Case-2 type problem of fabrication layout Development.
Case 2: Cone Diameter and Cone Height Given
Step 1: Define Generalized Diagram for Full Cone Layout Development.
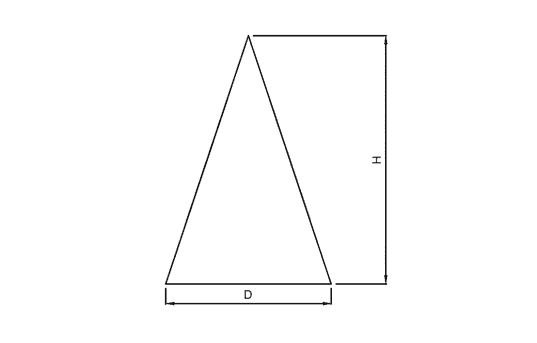
Step 2: Define Variables for Full Cone Layout
Let,
D = Base Mean Diameter of Cone.
H = Cone Height.
R = Development Radius.
Θ = Development Angle.
X = Cone Cord Length.
Step 3: Calculate Development Radius R.
R = √ ( H2 + (D/2)2 )
or
α = Tan-1 ( H / (D/2) )
R = ( D/2 ) / Cos (α)
Step 4: Calculate Development Angle Θ.
Θ = ( (D/2) / R ) x 360
Step 5: Calculate Cone Cord Length X.
X = 2 x R x Sin (Θ/2)
Step 6: Development of Cone Layout.

So, by using Numerical Formulae you can generate fabrication Layout Development of Full Cone in a very faster and efficient way.
In the above Two Methods, we learn How to Layout Full Cone Using Geometrical and Numerical Methods, now we will see one Practical Example Solution Using Numerical Method so that we can understand in better layouting by practicing it Practically.
Practical Example Solution by Numerical Method or Calculation Method
Example: Generate Fabrication Layout Development Markings of Full Cone for Following Sizes:
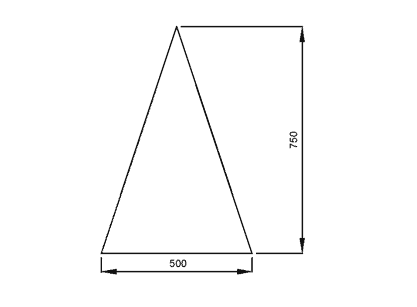
Solution:
Step 1: Note Down the Given Data of the Example.
Given Data:
D = 500
H = 750.
Step 2: Calculate Development Radius R
R = √ ( H2 + (D/2)2 )
R = √ ( 7502 + (500/2)2 )
R = √ ( 562500 + (62500) )
R = 790.56 mm.
Step 3: Calculate Development Angle Θ.
Θ = ( (D/2) / R ) x 360
Θ = ( (500/2) / 790.56 ) x 360
Θ = 113.84 Degree.
Step 4: Calculate Cone Cord Length X.
X = 2 x R x Sin (Θ/2)
X = 2 x 790.56 x Sin (113.84 / 2)
X = 1324.84 mm.
Step 4: Mark Development Layout Using Above Dimensions.
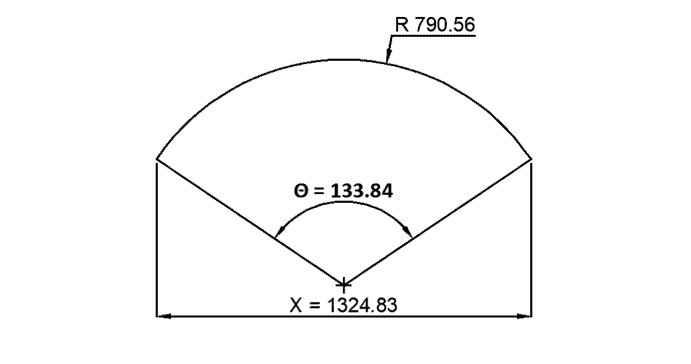
This is Final Fabrication Layout Markings of Full Cone for Given Example solved by using Numerical Method. You have practice this method to become master in this type of layout and after practicing you will have confidence in your layouts and in the latter part after becoming expert you reduce your work by using the method with the help of computerizes numerical tools, for increase your accuracy and save the time of calculations.
Now we will see this example Solution checking process so that you can be assured about your calculation and verify your result with some standard tested reference.
Example Solution Checking for Full Cone Layout using Fabrication Calculator
We are providing this example solution Checking Method to you so that you can easily verify your calculated values with some standard tested tool so that become more confident while layouting and easily practice using this method till you become an expert in layouting by Numerical method. We had already tested is Tool with advanced Computer Tool so that you can trust this tool and become more accurate in calculating values.
Now we will see the example solution checking Method, First You have to Download our Mobile Application from Our Website or Google play store or Apple App Store.
Download Links for Our Fabrication Calculator App :
Fabrication Calculator App from Our Website.
Fabrication Calculator App from Google Play Store.
Fabrication Calculator App from Apple App Store.
Solution Checking Process: Download above Mobile Application to your mobile check example Result Values with App results in Value. Follow below Steps of Checking Solution of Full Cone Layouts we had also added Screen Shots for Better Understanding of this Checking Methods.
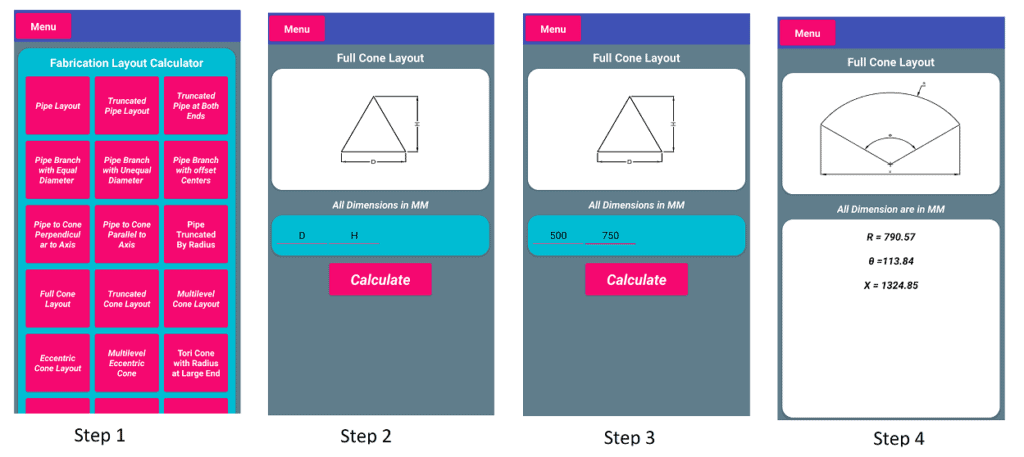
Step 1: Select Full Cone Option from Application Home Screen as shown in the below image for step 1.
Step 2: Enter Input data of Cone Diameter as 500 mm and Cone Height as 750 mm in the input Fields and Press Calculate Button as shown in the below image of step 2.
Step 3: Check Result Values with your Calculated Values if your calculated values Match with this Result Page Value then you are correct if your values are not matching with result page values then recheck your calculation and Find out Correct values for Accurate Result. Refer to step 4.
In such a way that You can check your Result by using this Fabrication Calculator App, you can also check using any methods you known. We are using this method we had already tested the result of this app so we are testing our result using this application.
Now, we learn all Cone Layout development process using all methods, similarly if you want to learn fabrication layout development of all fabrication shapes in detailed then you can join our 70 days Video Course on Fabrication Layout Development Click here to Know Course Details.
If you are working in the field of fabrication then we have simplified your day to day fabrication activity by developing various calculators so that you can minimize your time and cost of fabrication also increase the accuracy of your fabrication works and improve your workmanships, so let’s try our free apps, Click here for more details…
If you want to learn fabrication layout or flat pattern layout development of various fabrication shapes by your own then you can buy our book “Master in Fabrication Layout Development “ or Click here to learn about our books.
We hope you learn all methods of cone layout development in all aspects.
The post Cone Layout Development by Marking and Calculation Method with Practical Example appeared first on Let'sFab.
]]>The post Pressure Vessel Weld Joint Category as per ASME Section VIII Div 1 UW-3 appeared first on Let'sFab.
]]>Pressure Vessel Weld Joint Category is a very important aspect of Pressure Vessels Fabrication. Weld Joint Category classification is done on the basis of joint strength, In this classification, the weaker joint has given more concentration and it is included in Higher Category.
Before learning to Weld Joint Category, We must have basic knowledge of Longitudinal weld joint and Circumferential weld joint, So lets Learn this joint Types and then we will learn Weld Joint Categories.
As we know manufacturing pressure vessels is a very precious job. Because one mistake during manufacturing causes a big problem to the user as well as to the manufacturer. The manufacturing pressure vessel in a single sheet is not possible and it also costlier. So we required cut sheets to joint each other to get the desired pressure vessel. So qualitative welding of these sheets is a very important task.
Here we have two main types of weld joint.
- Longitudinal weld Joint
- Circumferential Weld Joint
Longitudinal Weld Joint :
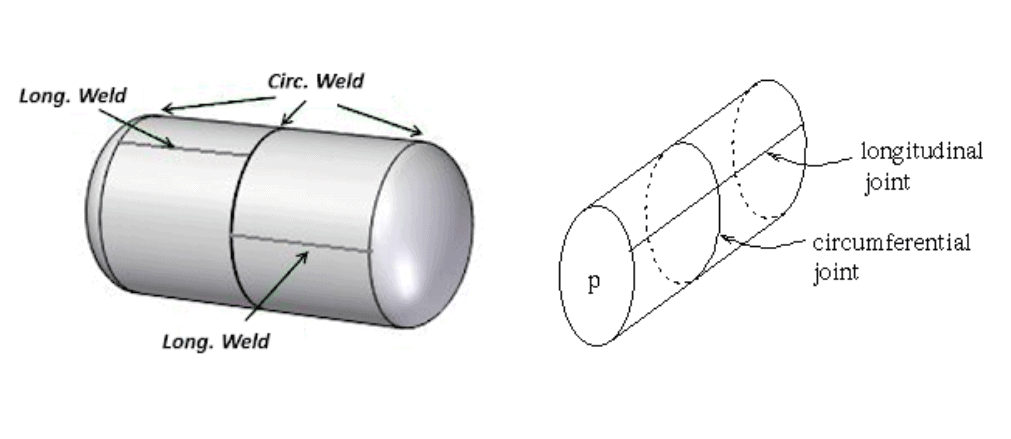
Weld Joint is done along the length or along the longitudinal direction is called as Longitudinal Joint. This Joint is also Called as L – Seam Joint or Long Seam Joint.
The name itself describes about longitudinal joint that these weld joints are joining two sheets horizontally, vertically or in any direction. In short, we can say these weld joints are long joints which are joining two sheets. If we are joining two sheets in dish also a L-Seam joint.
Circumferential Weld Joint :
Weld Joint is done along the circumference or along the circumferential direction is called as Circumferential Joint. Circumferential weld joint is also known as C-Seam weld Joint or Circum weld joint.
A circumferential weld may be a sort of weld that’s wont to join two round objects around their circumference. In simple language, we can say C seam joint is used to join two sheets in the round or circumferential direction. E.g. joining of the Shell to Dish End. or Shell to Shell Joint.
A circumferential weld are often administered by many various sorts of welding processes, and a spread of fabric diameters and material types are often joined together by a circumferential weld. The weld area may be prone to corrosion. The inside of the tubing or pipe can collect debris round the weld area, increasing the danger of corrosion. Furthermore, the fabric properties of the tubing or pipe near the circumferential weld area might be altered during the weld process, allowing differing types of corrosion to occur around the weld, both on the within diameter and therefore the outside diameter. It may be necessary to apply a coating to the circumferential weld area after the welding has been performed to protect the weld.
Longitudinal Stress Vs Circumferential Stress:
While designing the pressure vessel consideration of longitudinal & circumferential stress is very important.
Longitudinal Stress:
Longitudinal stresses developed in the vessel’s shell by the wind and earthquake loads must be added to the longitudinal stresses attributable to the internal pressure.
Circumferential Stress:
circumferential stress, or hoop stress, traditional stress within the tangential (azimuth) direction. axial stress, a traditional stress parallel to the axis of cylindrical symmetry. Radial stress, the stress or a force in directions of coplanar with but perpendicular to the symmetry axis.
By the below equation, we can understand the relationship between these stresses which effects on the weld joint.
σL = 2 x σC
Where,
σL = Longitudinal Stress
σC = Circumferential stress
From the above equation, we can learn longitudinal stress is always double circumferential Stress. Hence longitudinal weld joints have more stress or pressure, hence chances of vessel bursting are more on longitudinal weld joints than circumferential weld joints.
As per ASME Section VIII Div. 01 UW-03, there are four types of weld joint categories
- Category A Weld Joint
- Category B Weld Joint
- Category C Weld Joint
- Category D Weld Joint
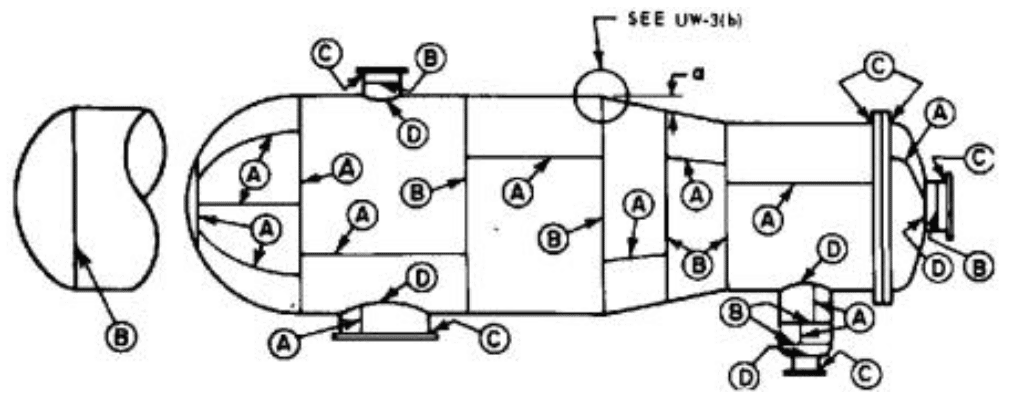
To help you better understand the weld joint category, we’ve taken a snap from ASME sec VIII Div.1 which shows the sort of Joint category as shown below,
Category A Weld Joint :
Longitudinal welded joints within the main shell of the vessel, a dish of the vessel, transition in diameter, or nozzles; any welded joint within a formed or flathead or within the side plates of the flat-sided vessel comes under category A.
In Short :
- All longitudinal welds joints in shell and nozzles
- All welds joints in heads, Hemispherical head to shell weld joint
All Category A Weld Joint is shown in the above figure and Highlighted by encircled A. So According to above figure Category A Weld Joint is for shell or dish longitudinal joints or L – Seam Joints and All the L-seam joints are coming under category A weld joint.
Category B Weld Joint :
Circumferential welded joints or C seam joints within the main shell of vessel communicating chambers, nozzles of the vessels, or transitions in diameter including weld joints between the transition and a cylinder at either the large or a small end; circumferential welded joints or c seam joints connecting formed heads other than hemispherical to main shells to transitions in diameter to nozzles or to communicating chambers.
In Short :
- All circumferential welds in shell and nozzles.
- Head to shell joint other than Hemisphere Head.
All Category B Weld Joint is shown in the above figure and Highlighted by encircled B. So According to the above figure All the circumferential joints or C-Seam joints will be in Category B weld joint.
Category C Weld Joint :
Welded joints in connecting flanges of vessel, Van stone laps, tube sheets, or flatheads to the main shell of vessel, to formed heads, to transition in diameter, to nozzles or to communicating chambers any welded joints connecting one side plate to another side plate of a flat-sided vessel comes under Category C.
In Short:
All Flange Weld Joints.
All Category C Weld Joint is shown in the above figure and Highlighted by encircled C. So According to above figure All Flange weld Joints coming under Category C weld joints.
Category D Weld Joint :
The welded joints of nozzles to main shell or dish comes under Category D. Manhole, inlet nozzle outlet nozzles, agitator entry nozzles joints to shell or dish are the example of the D category nozzle.
In Short :
All Nozzle Attachment Weld Joints.
All Category D Weld Joint is shown in the above figure and Highlighted by encircled D. So According to above figure All Nozzle attachment weld Joints coming under Category D weld joints.
This All about Category A, Category B, Category C, Category D weld joints in pressure vessels.
Interlinking Between Weld Joint Category, Join Efficiency and Radiography :
The American Society Of Mechanical Engineers (ASME) formed some rules regarding the manufacturing of pressure vessels.
Let us start out by briefly explaining those terms:
Radiography test is a non-destructive testing method of inspecting some hidden cracks in the material by using radio magnetic radiation to penetrate through the materials. The purpose is to make sure the structural integrity of the weld joint. As per ASME, there are four sorts of Radiography test (RT), i.e. RT1, RT2, RT3, and RT4.
Joint efficiency is that the number won’t define welded joint strength which basically depends on the RT type. This Joint efficiency plays an important role in determining the thickness of the pressure vessel components in Mechanical calculation. For Radiography Test 1 (RT1) and Radiography Test 2 (RT2), joint efficiency is 1.0, for RT3 efficiency is 0.85 and RT4 efficiency is 0.70.
The Weld Joint Category is how each weld on a vessel is assessed to a Joint category, supported the criticality. As per ASME, there are four sorts of weld joint categories, Category A, Category B, Category C, and Category D.
Now we will see how these three are interlinked as per ASME Sec VIII Div.1
As per ASME Sec VIII Div.1 the RT Type 1 or 2 or 3 or 4 are going to be selected supported the sort of weld joint category A or B or C or D., In turn, the sort of RT 1 or 2 or 3 or 4 will decide the Joint efficiency value 1.0 or 0.85 or 0.7. So this is often how the Radiography test, Joint efficiency, and Weld Joint category are interlinked as per ASME Sec VIII Div.1.
To give an example, we’ve detailed the RT type with the Joint efficiency supported weld category.
Category A and category D butt welds shall be fully radiography (RT1) hence the Joint efficiency are 1.0.
Category B and category C butt welds shall be spot radiography (RT3) hence the joint efficiency are 0.85.
This is because longitudinal joints or L seam joints are more critical than circumferential joints.
In general, heads connecting with shell will fall on Category B (RT-3 Spot Radiography), however, just in case of hemispherical head, the top with shell joint will fall on Category A (RT-2 full radiography), because this joint is more critical or it’ll be under double stress.
This all about Longitudinal Joint, Circumferential Joint, Longitudinal Stress, Circumferential Stress, Weld Joint Category, Weld Joint efficiency, and Radiography, we hope you will learn all concepts in detail.
If you are working in the field of fabrication then we have simplified your day to day fabrication activity by developing various calculators so that you can minimize your time and cost of fabrication also increase the accuracy of your fabrication works and improve your workmanships, so let’s try our free apps, Click here for more details…
If you want to increase your knowledge by learning from us then you can join our various video course in the field of fabrication, Click here for more details.
The post Pressure Vessel Weld Joint Category as per ASME Section VIII Div 1 UW-3 appeared first on Let'sFab.
]]>The post What is the Difference between Pipes and Tubes? appeared first on Let'sFab.
]]>One of the foremost frequent questions we have in our mind is “Pipe and tube is the same or different”? Although pipes and tubes may look similar the fact is they are quite different in nomenclature and sizing, so we discussed the difference between pipes and tubes in this post.
The terms Pipe and Tube are almost interchangeable, although minor differences exist — generally, a tube has tighter engineering requirements than a pipe. Both pipe and tube imply A level of rigidity and permanence, whereas a hose is typically portable and versatile. A tube and pipe could also be specified by standard pipe size designations, e.g., nominal pipe size, or by nominal outside or inside diameter and/or wall thickness. Also, there is a difference between the actual dimensions of the pipe and nominal dimensions of the pipe which is: A 1-inch pipe will not measure 1 inch in outside or inside diameter, Also there are many types of tubing are specified by actual inside diameter (I.D), outside diameter (O.D), or wall thickness.
We will now see some basics of Pipes and Tubes and then we will move to actual difference between pipes and tubes.
What is Pipe?
The pipe is a pressure-tight circular hollow section that used in piping systems to transport gases or fluids.
The most important dimension for a pipe is the outer diameter (OD) together with the wall thickness (WT). OD minus 2 times WT (schedule) determines the inside diameter (ID) of a pipe, which determines the liquid capacity of the pipe.
Examples of actual O.D. and I.D.
Actual outside diameters
- NPS 1 actual Outer Diameter = 1.5/16″ (33.4 mm)
- NPS 2 actual Outer Diameter = 2.3/8″ (60.3 mm)
- NPS 3 actual Outer Diameter = 3½” (88.9 mm)
- NPS 4 actual Outer Diameter = 4½” (114.3 mm)
- NPS 12 actual Outer Diameter. = 12¾” (323.9 mm)
- NPS 14 actual Outer Diameter = 14″ (355.6 mm)
Actual inside diameters of a 1 inch pipe.
- NPS 1-SCH 40 = Outer Diameter 33,4 mm – WT. 3,38 mm – Inner Diameter 26,64 mm
- NPS 1-SCH 80 = Outer Diameter ,4 mm – WT. 4,55 mm – Inner Diameter 24,30 mm
- NPS 1-SCH 160 = Outer Diameter 33,4 mm – WT. 6,35 mm – Inner Diameter 20,70 mm
Such as above defined, the inside diameter is determined by the outside diameter (OD) and wall thickness (WT). The most important mechanical parameters for pipes are the pressure rating, the yield strength, and the ductility.
The standard combinations of pipe Nominal Pipe Size and Wall Thickness (schedule) are covered by the ASME B36.10 and ASME B36.19 specifications (respectively, carbon and alloy pipes, and stainless steel pipes).
- For pipe sizes less than Nominal Pipe Size (NPS)14 inch (DN 350), both methods give a nominal value for the Outer Dia. that is rounded off and is not the same as the actual Outer Dia. For example, NPS 2 inch and DN 50 are the same pipes, but the actual Outer Dia. is 2.375 inches or 60.33 millimeters. The only thanks to obtaining the particular Outer Dia. is to seem it up during a reference table.
- For pipe sizes of Nominal Pipe Size (NPS) 14 inch (DN 350) and greater the NPS size is the actual diameter in inches and the DN size is equal to NPS times 25 (not 25.4) rounded to a convenient multiple of fifty. For example, NPS 14 has an Outer Dia. of 14 inches or 355.60 millimeters and is equivalent to DN 350.
Use of Pipes :
- Process Pipings
- Process Equipment Manufacturing.
- Plumbing
- Tap water
- Irrigation
- Pipelines for transportation of gas or liquid over long distances
- Compressed air systems
- Pipe bombs
- Casing for concrete pilings used in construction projects
- High-temperature or high-pressure manufacturing processes
- The petroleum industry
- Oil well casing
- Oil refinery equipment
- Delivery of fluids, either gaseous or liquid, during a process plant from one point to a different point within the process
- Delivery of bulk solids, during a food or process plant from one point to a different point within the process
- The development of high storage vessels (note that enormous pressure vessels are constructed from the plate, not pipe due to their wall thickness and size).
Additionally, a pipe is employed for several purposes that don’t involve conveying fluid. Handrails, scaffolding, and support structures are often constructed from a structural pipe, especially in an industrial environment.
Manufacturing of pipes :
There are three processes for metallic pipe manufacture. Centrifugal casting of hot alloyed metal is one of the foremost prominent processes. Ductile iron pipes are generally manufactured as like that. Seamless (SMLS) pipe is made by drawing a solid billet over a piercing rod to make the hollow shell. As the manufacturing process doesn’t include any welding, seamless pipes are seemed to be stronger and more reliable. Historically, a seamless pipe was considered withstanding pressure better than other types and was often more available than welded pipe.
Progressive since the time of 1970 in materials, process control, and non-destructive testing allow the correctly specified welded pipe to replace seamlessly in many uses & applications. Welded pipe is made by rolling plate and welding the seam (usually by electrical resistance welding (“ERW”), or Electric Fusion Welding (“EFW”)). The weld flash is often faraway from both inner and outer surfaces employing a scarfing blade. The weld zone also can be heat-treated to form the seam less visible. Welded pipe often have tighter dimensional tolerances than the seamless type, and maybe cheaper to manufacture.
There are several processes that may be used to produce ERW pipes. Each of those processes results in the coalescence or merging of steel components into pipes. Electric current is skilled the surfaces that need to be welded together; because the components being welded together resist the electrical current, heat is generated which forms the weld. Pools of molten metal are formed where the 2 surfaces are connected as a robust current is skilled the metal; these pools of molten metal form the weld that binds the two abutted components.
Electric Resistance Weld pipes are manufactured from the longitudinal welding of steel. The welding process for ERW pipes is continuous, as against the welding of distinct sections at intervals. ERW process uses steel coil as feedstock.
The High-Frequency Induction Technology (HFI) welding process is employed for manufacturing ERW pipes. In this process, the present to weld the pipe is applied by means of a coil around the tube. High-Frequency Induction Technology (HFI) is usually considered to be technical “admirable quality” to “ordinary ordinary” ERW when manufacturing pipes for critical applications, like for usage within the energy sector, additionally to other uses inline pipe applications, also as for casing and tubing.
Large-diameter pipe (25 centimeters (10 in) or greater) could also be ERW, EFW, or Submerged Arc Welded (“SAW”) pipe. There are two technologies which will be wont to manufacture steel pipes of sizes larger than the steel pipes which will be produced by seamless and ERW processes. The two sorts of pipes produced through these technologies are longitudinal-submerged arc-welded (LSAW) and spiral-submerged arc-welded (SSAW) pipes. LSAW is made by bending and welding wide steel plates and most ordinarily utilized in oil and gas industry applications. Due to their high cost, LSAW pipes are seldom utilized in lower value non-energy applications like water pipelines. SSAW pipes are produced by spiral (helicoidal) welding of steel coil and have a price advantage over LSAW pipes because the process uses coils instead of steel plates. As such, in applications where spiral-weld is suitable, SSAW pipes could also be preferred over LSAW pipes. Both LSAW pipes and SSAW pipes compete against ERW pipes and seamless pipes within the diameter ranges of 16”-24”. Tubing for flow, either metal or plastic, is usually extruded.
The material of Construction for Pipes :
A pipe is formed out of many sorts of material including ceramic, glass, fiberglass, many metals, concrete, and plastic.
Typically, metallic piping is formed of steel or iron, like unfinished, black (lacquer) steel, steel, chrome steel, galvanized steel, brass, and ductile iron. Iron-based piping is subject to corrosion if used within a highly oxygenated water stream. Aluminum pipe or tubing could also be utilized where iron is incompatible with the service fluid or where weight may be a concern; aluminum is additionally used for warmth transfer tubing such as in refrigerant systems. Copper tubing is popular for domestic water (potable) plumbing systems; copper could also be used where heat transfer is desirable (i.e. radiators or heat exchangers). Inconel, chrome-moly, and titanium steel alloys are utilized in heat and pressure piping in process and power facilities. When specifying alloys for new processes, the known issues of creep and sensitization effect must be considered.
Lead piping remains found in old domestic and other water distribution systems but is not any longer permitted for brand spanking new potable water piping installations thanks to its toxicity. Many of the building codes now require the lead piping in residential or institutional installations which will be replaced with non-toxic piping or that the tubes’ interiors be treated with orthophosphoric acid. According to a senior researcher and lead expert with the Canadian Environmental Law Association, “…there is no safe level of lead [for human exposure]”. In 1991 the US EPA issued the Lead and Copper Rule, it’s a federal regulation that limits the concentration of lead and copper allowed publicly beverage, as well as the permissible amount of pipe corrosion occurring thanks to the water itself. In the US it’s estimated that 6.5 million lead service lines (pipes that connect water mains to home plumbing) installed before the 1930s are still in use.
Plastic tubing is widely used for its lightweight, chemical resistance, non-corrosive properties, and simply making connections. Plastic materials include polyvinyl chloride (PVC), chlorinated polyvinyl chloride (CPVC), fiber-reinforced plastic (FRP), reinforced polymer mortar (RPMP), polypropylene (PP), polyethylene (PE), cross-linked high-density polyethylene (PEX), polybutylene (PB), and acrylonitrile butadiene styrene (ABS), for example. In many countries, PVC pipes account for many pipe materials utilized in buried municipal applications for beverage distribution and wastewater mains. Market researchers are forecasting total global revenues of more than US$80 billion in 2019. In Europe, the market value will amount to approx. €12.7 billion in 2020.
The pipe could also be made up of concrete or ceramic, usually for low-pressure applications like gravity flow or drainage. Pipes for sewage are still predominantly made up of concrete or vitrified clay. Reinforced concrete is often used for large-diameter concrete pipes. This pipe material is often utilized in many sorts of construction and is usually utilized in the gravity-flow transport of stormwater. Normally, such pipe having a receiving bell or a stepped fitting, with various sealing methods applied at installation.
Traceability and positive material identification (PMI):
When the alloys for piping are forged, metallurgical tests are performed to work out the material composition accidentally of every element within the piping, and therefore the results are recorded in a Material Test Report (MTR). These tests can be used to prove that the alloy conforms to various specifications (e.g. 316 SS, 304 SS). The tests are stamped by the mill’s QA/QC department and can be used to trace the material back to the mill by future users, such as piping and fitting manufacturers. Maintaining the traceability between the alloy material and associated MTR is a crucial quality assurance issue. QA often requires the warmth number to be written on the pipe. Precautions must also be taken to prevent the introduction of counterfeit materials. As a backup or a guaranty which avoids problems in future regarding etching/labeling of the material identification on the pipe, Positive Material Identification is performed employing a handheld device; the device scans the pipe material using an emitted electromagnetic radiation (x-ray fluorescence/XRF) and receives a reply that’s spectrographically analyzed.
What is Tube?
The meaning of TUBE is to be round, square, rectangular, and oval hollow sections that are used for pressure equipment, for mechanical applications, and for instrumentation systems. In oil and gas industries, tubes are not just used as a structural part but also used in the heat exchanger and fired heater for a process application.
Tubes are indicated with an outer diameter and wall thickness, in inches or in millimeters.
Tubes are typically ordered to outside diameter and wall thickness; however, it’s going to even be ordered as OD & ID or ID and Wall Thickness. The strength of a tube depends on the wall thickness of the tube. To define the thickness of the tube gauge number is used. Smaller gauge numbers indicate larger outside diameters. The inside diameter (ID) is theoretical. Tubes can are available different shapes like square, rectangular, and cylindrical, whereas Pipe is usually round. The circular shape of the pipe makes the pressure force evenly distributed. Pipes accommodate larger applications with sizes that range from a ½ inch to several feet. Tubing is usually utilized in applications where smaller diameters are required
Tubing is manufactured in three classes: seamless, as-welded, or electric resistant welded (ERW) and drawn-over-mandrel (DOM).
- Production of seamless tubing done by extrusion or rotary piercing.
- Drawn-over-mandrel (DOM) tubing is produced by a cold-drawn electrical-resistance-welded tube that’s drawn through a die and over a mandrel to make such characteristics as dependable weld integrity, dimensional accuracy, and an excellent surface finish.
There is a lot of industry and government standards for pipe and tubing. Many standards exist for tube manufacture; a number of the foremost common are as follows:
- American Society for Testing and Materials ASTM A213 Standard Specification for Seamless Ferritic and Austenitic Alloy-Steel Boiler, Superheater, Heat-Exchanger Tubes.
- American Society for Testing and Materials ASTM A269 Standard Specification for Seamless and Welded Austenitic Stainless Steel Tubing for General Service
- American Society for Testing and Materials ASTM A270 Standard Specification for Seamless and Welded Austenitic Stainless Steel Sanitary Tubing
- American Society for Testing and Materials ASTM A511 Standard Specification for Seamless Stainless Steel Mechanical Tubing
- American Society for Testing and Materials ASTM A513 is the Standard Specification for Electric Resistance Welded Carbon and Alloy Steel Mechanical Tubing
- American Society for Testing and Materials ASTM A554 Standard Specification for Welded Stainless Steel Mechanical Tubing
- British Standard BS 1387:1985 are the standards for the specification of screwed and socketed steel tubes and tubular and for plain end steel tubes suitable for welding or for screwing to BS 21 pipe threads
American Society for Testing and Materials (ASTM) material specifications generally cover a spread of grades or types that indicate a selected material composition. Some of the most commonly used are:
- TP 304
- TP 316
- MT 304
- MT 403
- MT 506
In installations using hydrogen, copper and chrome steel tubing must be factory pre-cleaned (ASTM B 280) and/or certified as instrument grade. This is because of hydrogen’s propensities: to explode within the presence of oxygen, oxygenation sources, or contaminants; to leak because of its atomic size; and to cause embrittlement of metals, particularly under pressure.
Strength Calculation for Tube :
For a tube of silicone rubber with a tensile strength of 10 MPa and an 8 mm outside diameter and 2 mm thick walls. The maximum pressure may be calculated as follows:
Outside diameter = 8 millimetres (0.3150 in)
Wall thickness = 2 millimeters (0.07874 in)
Tensile strength = 10 * 1000000 [Pa]
Bursting Pressure (BP) = (Tensile strength * Wall thickness * 2 / (10 * Outside diameter) ) * 10 [Pascal]
Gives bursting pressure of 5 MPa.
Using a safety factor:
Pressure max (P max.)= (Tensile strength * Wall thickness * 2 / (10 * Outer diameter)) * 10 / factor of safety [Pascal]
The Difference Between Pipes and Tubes :
The difference between pipes and tubes can be briefly done by considering some pipes and tubes parameters such as Shapes, Measurement or Dimensions, Wall Thickness, Production Range, Telescoping Abilities, Rigidity, Tolerances (straightness, dimensions, roundness, etc), Production Process, Delivery time, Applications, Metal Types, Size, Strength, End Connections, and Market Price.
Now we will summarize this pipes and tubes difference tabular form so that it helps you to understand in better way.
| Sr.No. | Parameters | Pipe | Tube |
| 1. | Shape: | Pipes are always round in shape. | Tubes can be square, oval, rectangular or round. |
| 2 | Measurement/Dimensions: | The most important dimension for a pipe is the outer diameter (OD) together with the wall thickness (WT). OD minus 2 times WT (SCHEDULE) determine the inside diameter (ID) of a pipe, which determines the liquid capacity of the pipe. The NPS does not match the true diameter, it is a rough indication | The most important dimensions for a steel tube are the surface diameter (OD) and therefore the wall thickness (WT). These parameters are expressed in inches or millimeters and express truth dimensional value of the hollow section |
| 3 | Wall Thickness: | The thickness of a steel pipe is designated with a “Schedule” value (the commonest are Sch. 40, Sch. STD., Sch. XS, Sch. XXS). Two pipes of different Nominal Pipe Size (NPS) and the same schedule have different wall thicknesses in inches or millimeters. | The wall thickness of a steel tube is expressed in inches or millimeters. For tubing, the wall thickness is measured also with a gage nomenclature. |
| 4 | Production Range: | Broad (up to 80 inches and above) | A narrower range for tubing (up to 5 inches), larger for steel tubes for mechanical applications |
| 5 | Telescoping Abilities | Pipe, on the opposite hand, doesn’t have a flash weld. | The tube can be telescoped. Attention towards the account for the flash weld inside the tube. DOM (Drawn over Mandrel) Tube is that the best material for telescoping because the within flash weld has been removed. |
| 6 | Rigidity | Pipes, on the opposite hand, are invariably rigid and can’t be shaped without special equipment. | Although copper and brass tubes are often shaped relatively easily, tubes are typically rigid. |
| 7 | Tolerances (straightness, dimensions, roundness, etc) | Tolerances are set, but rather loose. Strength is not a major concern. | Steel tubes are produced to very strict tolerances. Tubulars undergo several dimensional quality checks, such as straightness, roundness, wall thickness, surface, during the manufacturing process. Mechanical strength is a major concern for tubes. |
| 8 | Production Process: | Pipes are usually made to stock with highly automated and efficient processes, i.e. pipe mills produce an endless basis and feed distributors stock round the world. | Tubes manufacturing is lengthier and more laborious. |
| 9 | Delivery time: | For pipe delivery time Can be short. | For tubes Generally longer |
| 10 | Applications: | Only pipes are pressurized (pressure rated) and considered to be used for the transference of fluids or gas. | Tubes, on the opposite hand, are utilized in structural applications. |
| 11 | Metal Types: | A wide range of materials is available e.g Stainless steel, Mild Steel, Copper, Brass, Bronze, Aluminium, Carbon Steel, Hot-rolled Steel, etc. | Tubing is available in carbon steel, low alloy, stainless steel, and nickel-alloys; steel tubes for mechanical applications are mostly of carbon steel. |
| 12 | Size: | Pipe is usually available in larger sizes than tube | Tube having small sizes than pipe. |
| 13 | Strength: | The Pipe is less strong than a tube. | A Tube is stronger than the pipe. |
| 14 | End Connections: | The most common are beveled, plain, and screwed ends. Mostly flange end or threaded connections are used. | Threaded and grooved ends are available for quicker connections on site. Mostly Tri clover end (TC Type) connection is used. |
| 15 | Market Price: | Pipes relatively lower price per ton than steel tubes. | Higher due to lower mills productivity per hour, and due to the stricter requirements in terms of tolerances and inspections. |
These are all differences between pipes and tubes done on the basis of the above parameters. This all about pipes and tubes difference we have explained in detail so that all your doubt concepts will clear and helps you to learn and enhance your knowledge.
If you are working in the field of fabrication then we have simplified your day to day fabrication activity by developing various calculators so that you can minimize your time and cost of fabrication also increase the accuracy of your fabrication works and improve your workmanships, so let’s try our free apps, Click here for more details…
If you want to increase your knowledge by learning from us then you can join our various video course in the field of fabrication, Click here for more details.
The post What is the Difference between Pipes and Tubes? appeared first on Let'sFab.
]]>The post What is a Flat Pattern or Fabrication Layout? How to make Flat Pattern or Fabrication Layout for Sheet Metal Works or Fabrication Shapes appeared first on Let'sFab.
]]>Flat Pattern is nothing but unfolded shape of any sheet metal shapes or fabrication shapes before forming processes such as Bending, Rolling, etc. We can also say that Flat pattern is a pre or raw flat surface before forming activity in sheet metal or fabrication Industry. In most of the fabrication Industries, the Flat Pattern is also called a Fabrication Layout.
Flat Pattern Making or Flat Surface Development process is very useful while working in the sheet metal Industry and Equipment fabrication Industry. In Sheet Metal or Fabrication Industry Flat Pattern making is useful for forming various shapes such as Conical Shapes, Box Shapes, Pipe Shapes, Transition Shapes such as Square to Round or Round to Square, or any complex shapes used for various applications in various Industry.
In Flat Pattern Marking we are calculating dimensions of shapes such as when we do compete forming process or fabrication process it will formed in to our required size Final shapes as per our manufacturing requirements.
Methods for Flat Pattern or Fabrication Layout Generating
Flat Pattern Marking can be generated by using following methods.
- Geometrical Method or Marking Method.
- Numerical Method or Calculation Method.
These above two methods are the basis of generating flat pattern marking of any fabrication shapes or sheet metal shapes. we can generate flat pattern marking of any shapes by using any one of the above methods.
How to Generate Flat Pattern or Fabrication Layout Marking of Fabrication Shapes or Sheet Metal Shapes.
Fabrication Layout or Flat Pattern marking can be generated by using various ways that we are going to lean ahead. Use of Fabrication Layout Generating Method depends upon various factors or applications of shapes or accuracy of shapes. As we are providing education is in the fabrication of process equipment so we see various ways of generating fabrication layout or flat pattern of various fabrication shapes on the aspect of the Fabrication Industry.
Now, we see various ways of generating fabrication layout or flat pattern these are listed below :
- Marking Method.
- Calculation Method.
- By using 2D Drafting Software.
- By using 3D CAD Software.
- By Using Flat Pattern Software.
- By Using Mobile Application.
We will now discussed all above ways of fabrication layout or flat pattern layout generating way on aspects of fabrication.
1. Marking Method or Geometrical Method
Marking Method is very old method of generating fabrication Layout or Flat Pattern method. In this Method, Fabrication Layout Markings are generated using geometrical concepts of surface development. In this method, geometrical dimensions of shapes are measured, and using some geometrical process or steps fabrication layout is generated. It is very widely used and popular method but it has various disadvantageous of this method and the major disadvantageous of this method is it required too much time and space for layout generating flat pattern fabrication layout. it also has one more big disadvantage is that lack of accuracy or we can not control accuracy because it depends upon manual works. So due to its time consumption and space requirements and lack of accuracy, now days this method is not preferred. But it this method is very important to learn because it is base of other method because now days this method is used by combination some modern software to reduce time and space requirement.
if you are working in the fabrication field this method is still used because most of the small fabricators can not afford modern tools or they do not have skilled manpower to use modern tools. This method is very helpful when you are working on a remote area where you don’t have any access to the software or modern tools of fabrication layout or flat pattern. As per our Point of view, it is very important to learn this method because it is still used in day to day fabrication activity of many industries. if you want to learn this method then you can join our 70 Days Video Course on Fabrication Layout were all commonly used shapes explained in a very simple way or if you don’t want to join this course you can also learn by yourself by reading our book “Master in Fabrication Layout Development”.
2. Calculation Method or Numerical Method
Calculation method or numerical method is also a widely used for generating fabrication layout or flat pattern layout. It is very popular method because you can used this method anywhere, required less time, no space requirement and accuracy is also better than marking method so most of the fabricator used this method while working in fabrication layouting. In this method you have to use some numerical calculation formulas to derive your flat pattern layout markings of required fabrication shapes or sheet metal shapes. You have to use different formulas for different shapes and you can calculate in very simple ways.
It is a very useful method and a time-saving method for fabrication layout. Its accuracy is very good but its accuracy mainly depends upon the user due to manual calculations. Nowadays this method is used with some modification by using computerized or numerical tools so that manual calculations should get avoided and get accurate results such as by using Microsoft Excel or any mathematical calculation tool for calculations. This method required no skilled manpower but should capable f doing mathematical calculations. if you want to learn this numerical calculation method then you can join our 70 Days Video Course on Fabrication Layout were all commonly used shapes explained in a very simple way with practical example solution or if you don’t want to join this course you can also learn by yourself by reading our book “Master in Fabrication Layout Development”
3. By using 2D Drafting Software
Fabrication Layout or Flat Pattern layout can also be generated by using 2D drafting software such as AutoCad or any similar drafting software. In this method, You have to developed fabrication layout or flat pattern layout by drafting 2D drawing of required fabrication shapes but for generating flat pattern you have to use marking method because this method is similar to marking method but the only difference is that you are doing this marking by drawing on 2D drawing software. This method is a modification method of marking method this method is used to avoid space requirement and reduce the time of marking and get higher accuracy than the normal marking method. It is modified method of the Marking Method. In most of the fabrication Industry, this method is very commonly used and AutoCad is very common 2D Drafting software is used in this method. The major disadvantage of this method is that it required skilled manpower and if you have to make some changes to shapes you have to repeat the same process again and it consumes time and cost. so for nowadays, other methods are used in day to day fabrication activity to faster results and accuracy.
4. By using 3D CAD Software
Fabrication Layout or Flat pattern layout is also generated by using 3D CAD Software. it is a very accurate, time-saving, and faster method. you can generate fabrication layout marking of any complex shapes by using this method. Normally SolidWorks or any other similar CAD software that having unfold or flat pattern generating options available in software can be used in this method. In this method, you have to make a 3D model of your required shape and just apply to unfold command or flat pattern option to generate a flat pattern or fabrication layout marking of these shapes and that can be used in fabrication works. This method is the most accurate, easy, and faster method for the flat pattern. This method has also some disadvantages such as it required very skilled manpower to use this software and it also required cost for buying these Softwares and skilled manpower so it is a very costly method so it is economical for those having already this software and manpower for some other works.
5. By using Flat Pattern Software
In today modern world lots of specializes software are available for some specific application similarly for generating Flat Pattern or Fabrication Layout some Flat Pattern generating software is also available in market such as Plate and Sheet Professional and any other similar software that specially made for flat pattern generation. You can use this software for you fabrication works and this software are very customized and can be available as per user requirements. This method is very simple to used and time saving method. it also has very accurate results so you can go for this method for your day to day fabrication or flat pattern activity. This software has only one disadvantages is that it required higher cost for buying this software.
6. By Using Mobile Application
It is a very modern and very popular method of generating flat pattern or fabrication layout because it is very handy and convenient to use. It has eliminated all disadvantages of all above methods discussed, so this method is become very popular nowadays. It generate very accurate results. It is very faster and does not consumes time of user it required only time required for inputting the values and it generate results in within seconds. It does not involves any cost of using this tool because this available at almost free of cost. It increase you efficiency and productivity by saving your time and material cost. It is very hand and portable you can use this tool to any where at any time. In this method you have to just download App in you mobile device and you can use it you have to select your required shape gives the input of this shapes and just click on calculate button then it will give you your results and using this results you can use this in your day to day fabrication activity.
Now you are thinking that how you will get will this tool at free of cost. By analyzing this problems of fabricator Let’sFab Educational Services has developed this tool for you at free of cost. if you want to download this tool in your device just click here or visit our website our apps page and download the Fabrication Flat Pattern Tool and use this in your fabrication works.
This is all about the fabrication layout. I hope you will get enough ideas about what is fabrication layout, what are the methods of fabrication layout, and ways of generating a flat pattern.
The post What is a Flat Pattern or Fabrication Layout? How to make Flat Pattern or Fabrication Layout for Sheet Metal Works or Fabrication Shapes appeared first on Let'sFab.
]]>The post What is ASME Section IX and its Overview of subsections for Welding and welder qualification process of WPS PQR WPQ appeared first on Let'sFab.
]]>ASME Section IX Code is set of rules, guidelines, and requirements for Welding, Brazing, and Fusing Qualifications. It is a reference code that helps for BPVC Construction Codes for Qualifications of Welder or Welding Operator, Brazer or Brazing Operator, and Fuser or Fusing Operator.
Subsections of ASME Section IX
- Part QG – General Requirements
- Part QW – Welding
- Part QB – Brazing
- Part QF – Fusing
- Mandatory Appendix
- Non-Mandatory Appendix
Now, we see the rules, guidelines and requirement s for welding and welder qualification as per ASME Section IX, out of above-listed subsections Part QG and Part QW are only related to welding qualification process. So that we will discuss Part QG and Part QW in Details.
Part QG – General Requirements for Welding, Brazing, and Fusing
In this part consist of all the general requirement that are required to follow for Welding, Brazing, and Fusing Qualification. Those requirements which are particularly applicable to only one process that is explained in their individual general requirement article. Part QG consist of the following subsections:
- QG 101 – Procedure Specifications
- QG 102 – Procedure Qualification Records
- QG 103 – Performance Qualification
- QG 104 – Performance Qualification Records
- QG 105 – Variables
- QG 106 – Organisational Responsibilities
- QG 107 – Ownership Transfers
- QG 108 – Qualifications Made to previous Editions.
- QG 109 – Definitions
In above subsections Variable (QG 105) and Organisational Responsibilities (QG 106) can be further subdivided into following subsections:
QG 105 – Variables:
- QG 105.1 – Essential Variables for Procedure
- QG 105.2 – Essential Variables for Performance
- QG 105.3 – Supplementary Variables
- QG 105.4 – Non-Essential variables
- QG 105.5 – Special Process Variables
- QG 105.6 – Applicability
QG 106 – Organisational Responsibility:
- QG 106.1 – Organisational Responsibilities for Procedure Qualifications
- QG 106.2 – Organisational Responsibilities for Performance Qualifications
- QG 106.3 – Organisational Responsibilities for simultaneous Performance Qualifications
Now, we will see second major part of ASME Section IX which is particularly applicable to Welding and Welder Qualifications.
Part QW – Welding
Part QW is consist of all requirement related to Welding and Welder qualifications only. it is further sub divided in to five article listed below:
- Article 1 – Welding General Requirements
- Article 2 – Welding Procedure Qualification
- Article 3 – Welding Performance Qualification
- Article 4 – Welding Data
- Article 5 – Standard Procedure Specification
ASME Section IX uses WPS, PQR, and WPQ Documents or forms are used for welding procedures qualifications, welding performance qualifications, and welder performance qualifications.
- WPS – Welding Procedure Specifications
- PQR – Procedure Qualification Records
- WPQ – Welder Performance Qualifications
If you want learn what is WPS, PQR, and WPQ in detailed then click here
WPS – This document or form specify Essential variables, Non-Essential variables, Supplementary variables, and other Variable ranges, etc.
PQR – This Document or form records Actual Variables Data, Test Data and Results Data, etc.
WPQ – This Documents or form record Actual Variables Data, Qualification Ranges, Test Data, and Results Data.
Now we will see summery of QW Part Welding Article in short.
Article 1: Welding General Requirements QW-100
This Article covers Welding General Requirements for Welding Procedure Specification (WPS), Performance Qualification Records (PQR) and Welding Performance Qualification (WPQ) under the scope of ASME Section IX.
Article 2: Welding Procedure Qualification QW-200
This Article Covers Rules, Guidelines and Requirements for Welding Procedure Qualifications. It helps to prepare WPS and PQR.
This Section Listed All Essential Variables, Non-Essential Variables, and Supplementary Variables Each Welding Process Separately. This Article helps to Specify a range of Essential Variables, Non-Essential Variables, and Supplementary Variables while preparation of WPS. As per ASME Section IX WPS form is used to specify ranges of these all variables and PQR form is used to record the value of each Essential Variables, Non-Essential Variables, and Supplementary Variables.
Article 2: Welding Performance Qualification QW-300
This Article Covers Rules, Guidelines and Requirements for Welder or Welding Operator Performance Qualifications. It helps to prepare WPQ forms.
This Article provides list of Essential variables for Welding Performance qualifications. WPQ forms must record a value for each essential variable used and must list a range qualified for each of these essential variables. This Article covers responsibility, type of tests, records, welder identification, positions for Welder Performance Qualifications. Welder and Welding Operator can qualified by interpreting and recording results of Destructive and Non-destructive Tests.
Article IV – Welding Data QW-400
This Article Covers All Welding Data required and used for preparation of Welding Procedure Specification (WPS), Performance Qualification Records (PQR), Welder Performance Qualifications (WPQ).
This Article includes following Welding Data :
- Joints
- Base Materials
- Filler Materials
- Positions
- Preheat
- Post weld Heat Treatment
- Gas
- Electrical Characteristics
- Technique
This Article also covers P-Number, F-Number and A-Number for Joining Materials and Welding Materials. This Article covers Maximum Qualification Limits of Thickness and Diameters for Welding Procedure and Performance Qualifications and also includes Qualification Positions for Welding and Welder Performance Qualifications.
Article 5 – Standard Procedure Specification
This Article covers rules, guidelines, and requirements for the adoption, demonstration, and application of the Standard Welding Procedure Specifications, (SWPSs).
If you want to increase accuracy, efficiency, and productivity of your fabrication works and save your time and cost of fabrication then you can use our various digitals tools that help you in your daily fabrication activity Click here know about our digital tools…
If you want to increase your knowledge by learning from us then you can join our various video course in the field of fabrication, Click here more for details about our courses.
The post What is ASME Section IX and its Overview of subsections for Welding and welder qualification process of WPS PQR WPQ appeared first on Let'sFab.
]]>The post Material Specific Gravity App Developed By Let’sFab appeared first on Let'sFab.
]]>Material Specific Gravity app is used to get specific Gravity value of all types of metal, liquids, gases, and other miscellaneous solids.
Click here to Download this App for Android Devices.
This has wide application for getting specific gravity value for various engineering application. This app is developed by letsfab to specific gravity value of materials so that it can be used in various letsfab app for calculating fabrication weight.
Categories for Material Specific Gravity:
- Metals at 62 Degree Fahrenheit.
- Hydrocarbons at 60 Degree Fahrenheit.
- Liquids at 62 Degree Fahrenheit.
- Gases at 32 Degree Fahrenheit.
- Miscellaneous Solids at 62 Degree Fahrenheit.
How To Use Material Specific Gravity App :
- First Install Our Specific Gravity App in your Android or Apple Device and Launch the App on your device.
- It will show an initial welcome screen with a progress bar after completing 100% of the progress bar it will take you to the Home Page of the App.
- When the Home page of the app is available with Five different categories for your selection as per your requirements.
- You have to select any one option from the Home Page when you click on any one option then it Lists of Material with Specific gravity value fall under this category.
- When you finish your calculations then you can exit this app by back pressing on the home page it shows you a notification for confirmation then exit this app if you are sure to exit the app.
This app has wide application in Engineering Field to helps various design calculation in the field of process equipment and this value is also wide used for fabrication weight calculation of engineering metals.
Click here to Download this App for Android Devices.
If you are looking for Various other useful fabrication Apps for your daily fabrication activity then Click here…
If you want to increase your knowledge by learning from us then you can join our various video course in the field of fabrication, Click here for details…
The post Material Specific Gravity App Developed By Let’sFab appeared first on Let'sFab.
]]>The post Hydro Test Pressure Calculator App Developed By Let’sFab appeared first on Let'sFab.
]]>Hydro Test Pressure Calculator app is used to Calculate the Pressure Vessels Hydro Test Pressure and Piping Hydro Test Pressure.
It is very helpful in piping and process equipment manufacturing Industry. It is also more useful in process plants for testing pressure vessels and piping.
Click here to Download this App for Android Devices.
Click here to Download this App for Apple Devices.
In This app Following Hydro Test Pressure Calculator Options are Available:
- Pressure Vessel Hydro Test Pressure Calculator.
- Piping Hydro Test Pressure Calculator.
How To Use Hydro Test Pressure Calculator App :
- First Install Our This App in your Android or Apple Device and Launch the App on your device.
- It will show an initial welcome screen with a progress bar after completing 100% of the progress bar it will take you to the Home Page of the App.
- When the Home page of the app is available with Two different calculator options for your selection as per your requirements.
- You have to select any one option from the Home Page when you click on any one option then it opens up the input page of the App.
- When input page opens you will see standard Input Image for understanding input field notations are displayed for your reference and by understanding, this notation fill all the input data to the input field and click on calculate button
- When you click on Calculate Button You will be displayed output page having all required result data for this calculator.
- If you left any input field empty then it will show you error notification so if you are getting this notification then check all your empty field and enter correct data to generate results.
- When you finish your calculations then you can exit this app by back pressing on the home page it shows you a notification for confirmation then exit this app if you are sure to exit the app.
It is very helpful in piping and process equipment manufacturing Industry. It is also more useful in process plants for testing pressure vessels and piping.
You can also calculate pressure is if material stress at room temperature is less than material stress is design temperature. In this app, it takes input as Maximum allowable working pressure or Design pressure, stress value at Design temp, Stress value at test temp.
Click here to Download this App for Android Devices.
Click here to Download this App for Apple Devices.
If you are looking for Various other useful fabrication Apps for your daily fabrication activity then Click here…
If you want to increase your knowledge by learning from us then you can join our various video course in the field of fabrication, Click here for details.
The post Hydro Test Pressure Calculator App Developed By Let’sFab appeared first on Let'sFab.
]]>The post Duct Calculator App Developed By Let’sFab appeared first on Let'sFab.
]]>Duct Calculator app used to calculate Duct Size of Rectangular and Round Duct by Using CFM and FPM. It is also Calculates Air Flow Velocity in FPM and Air Flow Rate in CFM for Round and Rectangular Ducts.
This app is useful for Designers and HVAC engineers working in the field of Heating and Ventilation and air Conditioning.
Click here to Download this App for Android Devices.
Click here to Download this App for Apple Devices.
Click here to Download for Apple macOS Devices.
In This App Following Duct Calculator Options are Available:
- Duct Size Calculator.
- CFM Calculator.
- FPM Calculator.
How To Use Duct Calculator App :
- First Install Our Duct Calculator App in your Android or Apple Device and Launch the App on your device.
- It will show an initial welcome screen with a progress bar after completing 100% of the progress bar it will take you to the Home Page of the App.
- When the Home page of the app is available with three different duct calculator options for your selection as per your requirements.
- You have to select any one option from the Home Page when you click any one option then it opens up the input page of the duct calculator.
- When input page opens you will see standard Input Image for understanding input field notations are displayed for your reference and by understanding, this notation fill all the input data to the input field and click on calculate button
- When you click on Calculate Button You will be displayed output page having all required result data for this calculator.
- If you left any input field empty then it will show you error notification so if you are getting this notification then check all your empty field and enter correct data to generate results.
- When you finish your calculations then you can exit this app by back pressing on the home page it shows you a notification for confirmation then exit this app if you are sure to exit the app.
In this app for Calculating Duct size air flow velocity in FPM and air flow rate in CFM required to Inputs and it gives result as required duct size of Rectangular and Round Duct Types in Inches.
In CFM calculator you have to give inputs as air flow velocity in FPM and Duct size of Round or Rectangular Duct Sizes Length, width or Diameter in Inches and it gives results as Air Flow Rate in CFM.
In FPM calculator you have to give inputs as air flow Rate in CFM and Duct size of Round or Rectangular Duct Sizes Length, width or Diameter in Inches and it gives results as Air Flow Velocity in FPM.
Click here to Download this App for Android Devices.
Click here to Download this App for Apple Devices.
Click here to Download for Apple macOS Devices.
If you are looking for Various other useful fabrication Apps for your daily fabrication activity then Click here…
If you want to increase your knowledge by learning from us then you can join our various video course in the field of fabrication, Click here for details.
The post Duct Calculator App Developed By Let’sFab appeared first on Let'sFab.
]]>The post Nozzle Orientation Calculator App By Let’sFab appeared first on Let'sFab.
]]>Nozzle Orientation calculator app is used to calculate nozzle marking for Shell Nozzle and Dish end Nozzles on pressure vessels, Heat Ex-changer, storage Tank, or other Process Equipment.
This app calculates arc length required for marking nozzle on the shell at a given orientation angle and at any Distance on Dish ends for Dish Nozzles.
Click here to Download this App for Android Devices.
Click here to Download this App for Apple Devices.
Click here to Download this App for Windows PC or Desktop.
Click here to Download for Apple macOS Device
In This App Following Nozzle Orientation Calculator Options are Available:
- Shell Nozzle Orientation Calculator.
- Dish End Nozzle Orientation Calculator.
How To Use Nozzle Orientation Calculator App :
- First Install This App in your Android or Apple Device and Launch the App on your device.
- It will show an initial welcome screen with a progress bar after completing 100% of the progress bar it will take you to the Home Page of the App.
- Home Page of the App Display Above listed Two different Calculator.
- You have to choose any one option of this Calculator by clicking on the button. it will take you to the input page of this calculator.
- If you have selected the Shell nozzle orientation calculator option then you have to enter Shell Outside Curcumeferance and Nozzle angle as input and click to calculate button.
- If you have selected the Dish End Nozzle Orientation Calculator option then you have to enter the Dish Diameter and Nozzle Straight distance as input and click on the calculate button.
- When you Click Calculate Button You will be displayed output page having all required result data for this calculator.
- If you left any input field empty then it will show you error notification so if you are getting this notification then check all your empty field and enter correct data to generate results.
- When you finish your calculations then you can exit this app by back pressing on the home page it shows you a notification for confirmation then exit this app if you are sure to exit the app.
This App calculates Nozzle Marking Distance while Marking on Pressure Vessel Dish end or Head of Different Types.
This app is Calculate Nozzle marking Distance for following Types of Dish ends or Heads
- Torispherical heads
- 2:1 Semi Ellipsoidal Heads
- Hemispherical Heads.
This app is very useful for fabrication fitter, Quality engineer, fabrication engineer, fabrication supervisor or production engineer.
this app is widely used in pressure vessel fabrication or process equipment fabrication.
Click here to Download this App for Android Devices.
Click here to Download this App for Apple Devices.
Click here to Download this App for Windows PC or Desktop.
Click here to Download for Apple macOS Device
If you are looking for Various other useful fabrication Apps for your daily fabrication activity then Click here…
If you want to increase your knowledge by learning from us then you can join our various video course in the field of fabrication, Click here more for details.
Watch this video on YouTube.
The post Nozzle Orientation Calculator App By Let’sFab appeared first on Let'sFab.
]]>